How to draw a realistic eye |

|
|
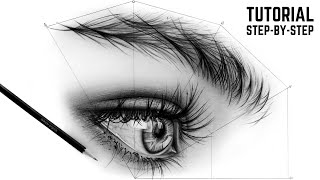
This is a tutorial on how to draw a realistic eye. In this step-by-step process for beginners, I'll explain all the techniques and tools I used in this drawing. Even if you're a complete beginner, this method will help you develop your drawing skills so that you can draw something to an advanced level :)
First, we’ll start with drawing the basic proportions and outlines, then we’ll draw the iris and pupil. In the next stage I’ll cover shading and blending the skin texture around the eye. I'll also show you some really effective but simple methods for achieving realistic skin tone and highlights. Next, I'll show you how to draw eyelashes and how to create the effect of make-up around the eyelashes. Finally, I'll cover how to draw eyebrows, including some tips for achieving a hyper-realistic three-dimensional look. If you have any questions, or requests for future video tutorials, leave them in the comments below! SECTIONS: 1) Proportions 0:40 2) Basic outlines 1:11 3) The iris and pupil 3:05 4) Shading the eye and eyelids 12:12 5) Skin around the eye 17:49 6) Eyelashes 21:52 7) Eyebrows 30:25 TOOLS: - Graphite pencils: HB, B, 3B, 5B, 6B - 6B black aquarelle pencil - tissue paper - blending stump or cotton bud - dry paint brush - mono zero eraser RELATED TUTORIAL: How to draw a face for beginners [step-by-step tutorial] https://youtu.be/LuxeW7ErHQ8 🔔 SUBSCRIBE HERE: https://www.youtube.com/channel/UCwpq38XhuxAEHQ9UBL2uLMw Reference photograph by Ksenia Zavialova used with kind permission: https://www.instagram.com/p/Bc9cKAHjY6k/ (Instagram: ks.zavialova) EQUIPMENT USED FOR FILMING/PHOTOGRAPHY: - 4K video camera: Sony AX53 - Still images: Canon 5DS-R DSLR camera - Canon EF 100mm f2.8 L Macro IS USM Lens - Manfrotto tripod: MK394-PQ - Neewer tabletop tripod: M225+CK30 - Light stand: Calumet MF-6040 - LED light panel: Travor FL-3090 - Sound recorder: Sony PCM D100 INSTAGRAM: https://www.instagram.com/p/CMziDdgB-SF/ #howtodraw #graphitepencils #realisticdrawing |
![How to draw a realistic eye [time-lapse]](https://ytimg.googleusercontent.com/vi/a6_oW-U8cKA/mqdefault.jpg)
![How to draw realistic eyes, nose, lips/mouth | tutorial [step by step]](https://ytimg.googleusercontent.com/vi/ysLTZqLFQaE/mqdefault.jpg)
![Realistic eye drawing [time-lapse]](https://ytimg.googleusercontent.com/vi/CXl5gGw6v3o/mqdefault.jpg)
![How to draw a portrait: real time tutorial with full voiceover [PART 1 of 4]](https://ytimg.googleusercontent.com/vi/OSw1CUwJPGo/mqdefault.jpg)
![How to draw a face for beginners [step-by-step tutorial]](https://ytimg.googleusercontent.com/vi/LuxeW7ErHQ8/mqdefault.jpg)
![How to draw a girl: easy tutorial [time-lapse]](https://ytimg.googleusercontent.com/vi/lgLYW5hI-_U/mqdefault.jpg)
![How to draw a portrait: real time tutorial with full voiceover [PART 3 of 4]](https://ytimg.googleusercontent.com/vi/DP1Re9CK37M/mqdefault.jpg)
![How to draw a portrait: real time tutorial with full voiceover [PART 2 of 4]](https://ytimg.googleusercontent.com/vi/PDj306ylYtk/mqdefault.jpg)
![Drawing and shading a female face with graphite pencil [part 1]](https://ytimg.googleusercontent.com/vi/_MU2DbW-IcY/mqdefault.jpg)
![Drawing and shading a female face with graphite pencil [part 2]](https://ytimg.googleusercontent.com/vi/pG06YRNcHlM/mqdefault.jpg)