Downgrade macOS Catalina to Mojave-from backup to restore |

|
|
An external USB stick or drive (hard drive or SSD) is required to create a macOS Installer. Use the index below. If I speak too slowly, speed me up by clicking on the gear icon, playback speed and setting the speed to 1.25 or 1.5 times speed. ;)
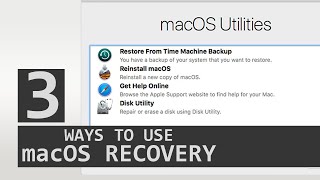
00:00 Intro 00:15 What you need. 01:23 Things to do before downgrading. 03:33 Plug in external drive to use as backup device. 03:57 Format external drive for Time Machine. 06:04 Setup Time Machine. 06:47 Backup Now. 08:24 Don't create documents while the backup is running. 10:03 Backup redunancy. 10:27 Make sure the backup was successful. 11:11 Use Disk Utility to create a small partition on our backup device to use as our installer. 13:21 Download the operating system we want to downgrade to, using a link to the App store. 14:33 Alternate method to download Mojave (or High Sierra) using Terminal. How to find the command. 16:00 How to launch Terminal. 16:23 Paste in the command to download the desired version of macOS. 17:09 Some computers can't download High Sierra. (Some can't support Mojave, either.) 17:53 Terminal shows some interesting error messages that we can ignore. 18:09 how to restart the download if it fails. 18:25 Ethernet is more reliable than Wi-Fi for downloading large files. 18:50 How to handle a corrupted download. 19:42 How to handle the error "This copy of 'install macOS application is too old." 20:09 Mojave download should be approx. 6.05 GB. 20:20 Find the Terminal command to create our USB installer. (Or read about it below) 21:48 Paste the command into Terminal to create our USB installer. 22:42 How to enter your password in Terminal. 23:26 Terminal would like to access files on a removable volume. 23:58 Done! How long should this take? 24:58 If you have a T2 chip. (If you don't, skip to 29:42. 29:42 Non-T2 chip owners resume here. Power (or restart) holding down the left-hand option key. 30:00 Booting from our USB installer. 31:31 Run Disk Utility. Be careful with Disk Utility. Click View, Show all devices. Take note of drives that are internal versus external. 32:08 If you have a Fusion drive, please see: https://www.youtube.com/watch?v=82-MNv8b_IY YOU MUST HAVE A BACKUP BEFORE THIS STEP. 32:19 Click Erase. 32:30 Accept the default format. 33:00 Give your drive a name. 33:40 Install macOS. 34:08 Mac setup-Recommended settings. 32:21 Restore from a Time Machine backup. 35:54 Migration complete. 36:00 Login for the first time. 36:30 Touch ID if you have a fingerprint sensor. 36:50 Allow blocked system extension. 37:25 Safari doesn't work. Get rid of question marks in Dock. 37:50 Dirty install macOS to fix Safari. 38:49 Allow blocked system extensions. 39:16 Launch Safari and now it works. 39:30 Mail will import old messages. 39:45 Photos doesn't work. 40:00 How to fix the Photos app. 43:10 How to fix iTunes. 45:25 Conclusion. # To download Mojave, copy and paste this into Terminal softwareupdate --fetch-full-installer --full-installer-version 10.14.6 # To download High Sierra, copy and paste this into Terminal softwareupdate --fetch-full-installer --full-installer-version 10.13.6 #Create the Mojave installer: sudo /Applications/Install\ macOS\ Mojave.app/Contents/Resources/createinstallmedia --volume /Volumes/MyVolume #Create the High Sierra installer: sudo /Applications/Install\ macOS\ High\ Sierra.app/Contents/Resources/createinstallmedia --volume /Volumes/MyVolume Other videos to watch: Time Machine tips after downgrading (important information if downgrading) https://www.youtube.com/watch?v=ot1oY... First impressions of the Sandisk Extreme Portable SSD: https://www.youtube.com/watch?v=Tbfw5... |

![[Guide] How to Downgrade MacOS Catalina to Mojave WITHOUT Losing your Data. Easy Step by Step](https://ytimg.googleusercontent.com/vi/lcBdwDjPSMU/mqdefault.jpg)


![Safely Downgrade macOS to Any Version [2024 Guide]](https://ytimg.googleusercontent.com/vi/QAK15Z59a2Y/mqdefault.jpg)