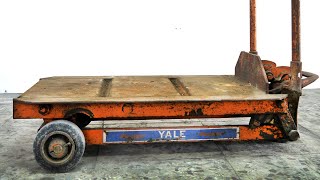
Antique 1950s Yale Lift Truck Restoration |

|
|
Build an exact replica of the legendary Knight Rider KITT from FanHome by visiting this link: https://bit.ly/restore_it And use code 'RESTOREIT' to become an early bird, get a free F&F tee and cap and pay only 99p for the first installment!
In this video I this video I'm restoring a 70 year old Yale lift truck. I picked this up a while ago when I came across it in a very cool antique store in the UK. As soon as I saw it, I knew it had to restore this beauty. I lugged it into the back of my car and have been storing it ever since. The trucked worked just as it did the day it came out of the factory and I'm not surprised. This thing is built like a tank and made to last. A few nuts were seriously seized, one of them I had to destroy. The other one was the one holding the bearings in the bearing cover for the spinning wheel. I didn't want to destroy the nut so I cleaned it out with contact cleaner, baked it, and packed it with new grease. All of this sadly happened off-camera as I was using a bad battery without knowing it. I really couldn't find any information about this particular lift truck. The color I painted it was matched as best I could to the original. Spare parts were not an option with this one. I like to keep things as original as possible, all of the original parts were used besides the spit pins. The stickers were printed by a company and they got the size slightly wrong. It's not a big deal and I have a sticker primer on order to rectify this in the future. I'm really happy with the final results. Sorry to those of you that have seen this. This is the last of the videos from the other channel that will appear on this channel. All restorations, cars or not, are now going to be posted to this channel. I hope you enjoyed watching this as much as I enjoyed restoring it. Timestamps: 00:00 – Intro 00:15 – Showing the lift truck 00:26 – The disassembly 05:11 – Knowling all of the pieces 05:30 – Degreasing in the parts washer 05:55 – Paint stripping 06:32 – Removing the rust 08:13 – Painting all of the parts with etch primer and wet on wet primer 08:36 – Cleaning up all of the casting imperfections 09:40 – Painting the primer, base coat, and clear coat 12:50 – Making the new sticker 13:59 – Working on the plaque 14:47 – Zinc electroplating the unpainted parts 15:22 – Knowling all of the restored parts 16:06 – Reassembly 22:48 – Before and after 23:09 – RNR eBay – Stay tuned 23:19 – Thanks for watching Time and costs of the restoration: We worked on this project for 2 weeks $10 for new split pins $10 for two low profile nuts $80 Worth of paint $15 for the stickers If you have any questions about the restoration, tools I'm using, or anything, just ask me in the comments. I read them all and try to reply as soon as possible. Subscribe for more of my content with the bell on to be notified. Below are my socials and places you can support the channel. Thank you for watching :) Follow me on Social media to keep up to date with videos and behind the scenes. My Patreon Page: https://www.patreon.com/RestoreIt My Twitter Page: https://twitter.com/Restore__It My Facebook Page: https://www.facebook.com/RestoreItChannel My Instagram Page: @RestoreItChannel PayPal Donations: Restoreitchannel@gmail.com Discord https://discord.gg/vNmCBk9 |