Snipping Tool in Windows PC Tips & Tricks to capture screenshots |

|
|
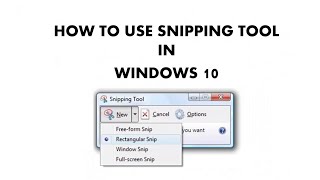
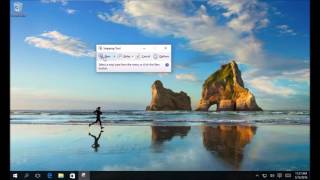
Like Windows 7 and Windows 8, Windows 10 too includes the Snipping Tool which lets you take screenshots in Windows 10 computer. When on the Start Screen, you can click on the Snipping Tool tile to open it. The tool will open, and you will find yourself immediately on your desktop.
When in the Desktop mode, you can open it by typing Snipping Tool in the Charms Bar Search. If you use it regularly, you can also create its desktop shortcut to access it easily. If you are a frequent user of the Snipping Tool, you can create a hotkey for it. Snipping Tool Keyboard shortcuts are as below: Alt+M – Choose a snipping mode Alt+N – Create a new snip in the same mode as the last one Shift+Arrow keys – Move the cursor to select a rectangular snip area Alt+D – Delay capture by 1-5 seconds Ctrl+C – Copy the snip to clipboard To read more on how to capture screenshots in Windows, how to open Snipping Tool using Hotkey, disable white overlay, capture parts of Windows 8 Start Screen, and more, click on https://www.thewindowsclub.com/snipping-tool-capture-screenshots-windows-8-tips |


![How To Use Snipping Tool In Windows 10 [Tutorial]](https://ytimg.googleusercontent.com/vi/DeOglvucFK4/mqdefault.jpg)

Windows 10 - Snipping Tool - How to Use Screen Snip to Take Screenshot - Shortcut Key Tutorial in MS
![How to use Windows 10 Snipping Tool - [ Screenshot Windows 10 Tutorial ]](https://ytimg.googleusercontent.com/vi/fBM1JZvePjg/mqdefault.jpg)